Raspberry Pi 4を使ってWi-Fiスポットを作成する方法
はじめに
Raspberry Pi 4は多機能で手頃な価格のシングルボードコンピュータです。本記事では、Raspberry Pi 4をWi-Fiスポットに変換する方法を解説します。家庭内のLAN環境改善に利用したり、ハニーポットとして活用したり、センサを接続して家庭内のマシンに繋ぐために構築するなど、さまざまな用途で活用することができます。手順に従って設定を行い、自分だけのWi-Fiスポットを作成しましょう。
Locationの設定
hostapdを使って設定するのですが、Raspberry pi4として必要な手続きがあります。
RaspbianをGUIで繋いでいる場合、Settingから設定できると思いますよね? 私も思っていたのですが、どうにもJPがなさそうです。

仕方ないのでTerminalから設定していきましょう。
sudo raspi-config
5.SetLocationを選択します。 各設定を進めていきましょう。
L1 Locale
この設定は不要なのですが、一応やっておきましょう。

Jp__JP.UTF-8を選択してEnterを押します。
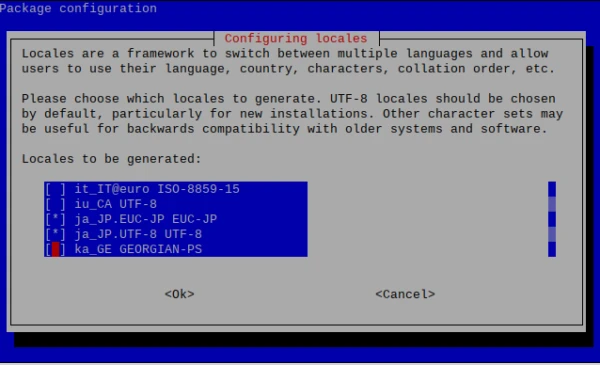
Default Localeとして、jp_JP.UTF-8を選択しましょう。
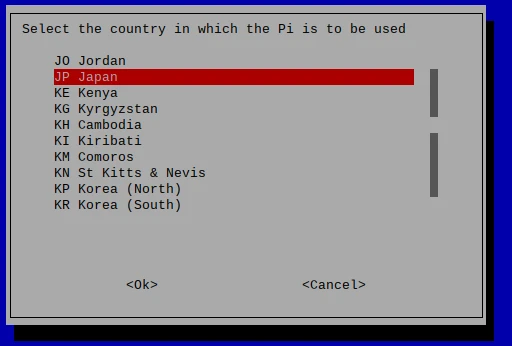
L4 WLAN Country
JP Japanを選びます。
一通りの設定が完了したら再起動します。
Wi-Fi化定番ソフトのインストール
sudo apt-get update
sudo apt-get install hostapd dnsmasq
Wi-Fiスポットの設定
dhcpの設定
先ずはdhcpdの設定から行います。 Wi-Fiに接続されたときに、IPアドレスの割り当てるDHCPサーバを構築するのがここでの手順です。
この手の設定ファイルを弄るのは怖いので、バックアップ取ります。
sudo cp /etc/dhcpcd.conf /etc/dhcpcd.conf.back
設定ファイルを開いて次の文言を末尾に追加します。
sudo vim /etc/dhcpcd.conf
デフォルトでコメントアウトされているものを有効にしていく作業がメインとなります。
interface wlan0
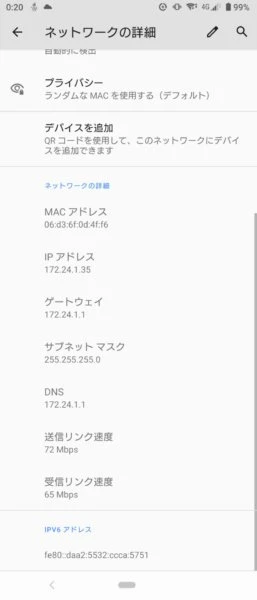
static ip_address=172.24.1.1/24
static routers=172.24.1.1
static domain_name_servers=172.24.1.1
static broadcast 172.24.1.255
もし上の記載がない場合は、同様に埋め込んでください。 デフォルトでコメントアウトされているものを有効にしていく作業がメインとなります。
追加するのは上記だけで良いのですが、全文載せます。
# A sample configuration for dhcpcd.
# See dhcpcd.conf(5) for details.

# Allow users of this group to interact with dhcpcd via the control socket.
#controlgroup wheel

# Inform the DHCP server of our hostname for DDNS.
hostname

# Use the hardware address of the interface for the Client ID.
clientid
# or
# Use the same DUID + IAID as set in DHCPv6 for DHCPv4 ClientID as per RFC4361.
# Some non-RFC compliant DHCP servers do not reply with this set.
# In this case, comment out duid and enable clientid above.
#duid

# Persist interface configuration when dhcpcd exits.
persistent

# Rapid commit support.
# Safe to enable by default because it requires the equivalent option set
# on the server to actually work.
option rapid_commit

# A list of options to request from the DHCP server.
option domain_name_servers, domain_name, domain_search, host_name
option classless_static_routes
# Respect the network MTU. This is applied to DHCP routes.
option interface_mtu

# Most distributions have NTP support.
#option ntp_servers

# A ServerID is required by RFC2131.
require dhcp_server_identifier

# Generate SLAAC address using the Hardware Address of the interface
#slaac hwaddr
# OR generate Stable Private IPv6 Addresses based from the DUID
slaac private

# Example static IP configuration:
# static ip_address=192.168.0.10/24
# static ip6_address=fd51:42f8:caae:d92e::ff/64
# static routers=192.168.0.1
# static domain_name_servers=192.168.0.1 8.8.8.8 fd51:42f8:caae:d92e::1

# It is possible to fall back to a static IP if DHCP fails:
# define static profile
#profile static_eth0
#static ip_address=192.168.1.23/24
#static routers=192.168.1.1
#static domain_name_servers=192.168.1.1

# fallback to static profile on eth0
#interface eth0
#fallback static_eth0

interface wlan0
static ip_address=172.24.1.1/24
static routers=172.24.1.1
static domain_name_servers=172.24.1.1
static broadcast 172.24.1.255
dnsmasq設定
接続された機器に払い出すIPアドレスのレンジを決定します。 dnsmasqを設定すると言いでしょう。 interfaceにはhostapdで設定したinterfaceを使いましょう。
sudo mv /etc/dnsmasq.conf /etc/dnsmasq.conf.orig
sudo vim /etc/dnsmasq.conf
interface=wlan0
dhcp-range=172.24.1.10,172.24.1.100,255.255.255.0,24h
hostapd設定
Wi-Fiスポット化を実施しましょう。
sudo touch /etc/hostapd/hostapd.conf
driver=nl80211
interface=wlan0
country_code=JP
hw_mode=a
ieee80211d=1
ieee80211n=1
ieee80211ac=1
wmm_enabled=1
vht_oper_chwidth=0
channel=36
auth_algs=1
wpa=2
wpa_key_mgmt=WPA-PSK
rsn_pairwise=CCMP
wpa_pairwise=TKIP
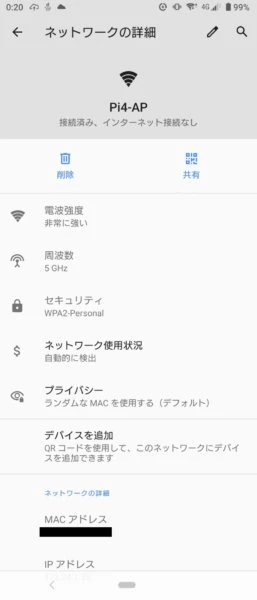
ssid=Pi4-AP
wpa_passphrase=raspberry
参考までに設定項目の中身を記載します。
| 設定項目 | 設定内容 |
|---|---|
| hw_mode | g=2.4GHz, a=:5GHz |
| auth_algs | 0=無し,1=WPA,2=WEP,3=両方 |
| interface | 使用するnetwork interface |
| wmm_enabled | WiFi Multimedia設定 0=無効,1=有効 *1 |
| ssid | Wi-Fi名称 |
| wpa_passphrase | パスワード |
| rsn_pairwise/wpa_pairwise | TKIP,CCMP, TKIP CCMP |
*1 WiFi Multimediaを有効にするかどうか無線QoS機能を有効にします。 動画などのストリーミング配信を行うときには、他の通信よりも優先的に処理をするようになります。
主要な設定といったらこの当たりですかね。
起動時読み込み設定ファイル設定
sudo vim /etc/default/hostapd
# Defaults for hostapd initscript
#
# WARNING: The DAEMON_CONF setting has been deprecated and will be removed
#          in future package releases.
#
# See /usr/share/doc/hostapd/README.Debian for information about alternative
# methods of managing hostapd.
#
# Uncomment and set DAEMON_CONF to the absolute path of a hostapd configuration
# file and hostapd will be started during system boot. An example configuration
# file can be found at /usr/share/doc/hostapd/examples/hostapd.conf.gz
#
DAEMON_CONF="/etc/hostapd/hostapd.conf"
hostapdが起動時に呼び出される設定ファイルを設定します。
エラー対応: Failed to start hostapd.service: Unit hostapd.service is masked.
こんなエラーが出たら一度unmaskして再度実行すると良いです。 systemctlにはサービス自体を起動出来なくするMask機能が備わっています。 実行不可能という方が正しいかもしれないですね。
unmaskとしたらこのサービスのシンボルリンクが呼べなくして実行不可状態を作り出しているようです。
sudo systemctl unmask hostapd
sudo systemctl enable hostapd
sudo systemctl start hostapd
実行結果
sudo reboot
再起動したら、Wi-Fiスポットとして検出できるようになっているはずです。
スマホからWi-Fi検索して、設定したパスワードを入力して接続してみましょう。
まとめ
この記事では、Raspberry Pi 4を使用してWi-Fiスポットを作成する方法について説明しました。手順に従って、Locationの設定、Wi-Fi化定番ソフトのインストール、Wi-Fiスポットの設定(dhcpの設定、dnsmasq設定、hostapd設定)を行いました。最後に、Wi-Fiスポットが正常に動作することを確認しました。
Raspberry PiをWi-Fiスポットとして使用することで、家庭内のLAN環境改善やハニーポットとして利用したり、センサを接続して家庭内のマシンに繋ぐことができます。また、無線LANルータが壊れた際の代替手段としても活用できます。今回の設定方法を参考に、Raspberry PiをWi-Fiスポットとして活用してみてください。