Flutter でQRコードを生成と読み取りをやってみよう
はじめに
FlutterでQRコードを表示したり、QRコードを読み取ったりしたいですよね。 簡単にできるので、記事に残します。 アルバイトで使うことになったので、その準備と事前調査という位置づけです。
よろしくお願いします。
QRコードを生成して読み出してみる。
まずQRコードの生成が必要となるため進めます。
準備
qr_code_scanner このパッケージを利用します。
flutter pub add qr_flutter
気の利いたことを残そうとも思いましたが、特筆すべき内容ないです。 いれるだけです。
QRコードを生成する
QRコード生成して表示する部分となります。
import 'package:qr_flutter/qr_flutter.dart';
QrImage(
  data: 'https://kenpos.dev',
  version: QrVersions.auto,
  size: 350.0,
)
必要最低限のコードです。
Flutterで最初サンプルとして作られるカウントアップアプリに追加するとこうなります。 ほぼほぼ原文そのままです。
import 'package:flutter/material.dart';
import 'package:qr_flutter/qr_flutter.dart';

void main() {
  runApp(const MyApp());
}

class MyApp extends StatelessWidget {
  const MyApp({super.key});

  // This widget is the root of your application.
  @override
  Widget build(BuildContext context) {
    return MaterialApp(
      title: 'Flutter Demo',
      theme: ThemeData(
        primarySwatch: Colors.blue,
      ),
      home: const MyHomePage(title: 'Flutter Demo Home Page'),
    );
  }
}

class MyHomePage extends StatefulWidget {
  const MyHomePage({super.key, required this.title});
  final String title;

  @override
  State<MyHomePage> createState() => _MyHomePageState();
}

class _MyHomePageState extends State<MyHomePage> {
  int _counter = 0;

  void _incrementCounter() {
    setState(() {
      _counter++;
    });
  }

  @override
  Widget build(BuildContext context) {
    return Scaffold(
      appBar: AppBar(
        title: Text(widget.title),
      ),
      body: Center(
        child: Column(
          mainAxisAlignment: MainAxisAlignment.center,
          children: <Widget>[
            const Text(
              'You have pushed the button this many times:',
            ),
            Text(
              '$_counter',
              style: Theme.of(context).textTheme.headline4,
            ),
            QrImage(
              data: 'https://kenpos.dev',
              version: QrVersions.auto,
              size: 350.0,
            ),
          ],
        ),
      ),
      floatingActionButton: FloatingActionButton(
        onPressed: _incrementCounter,
        tooltip: 'Increment',
        child: const Icon(Icons.add),
      ), // This trailing comma makes auto-formatting nicer for build methods.
    );
  }
}
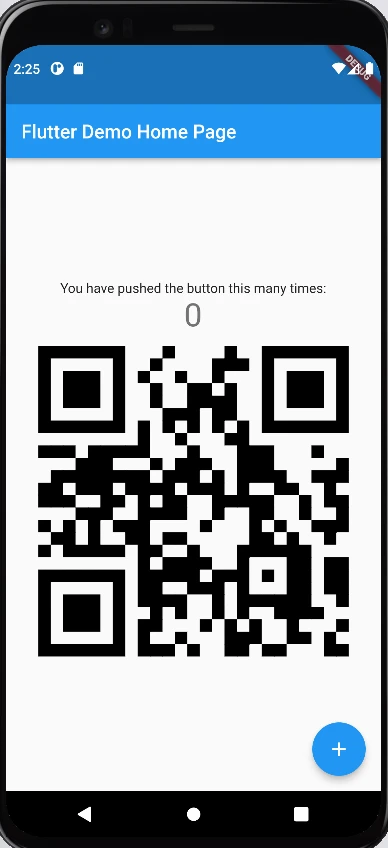
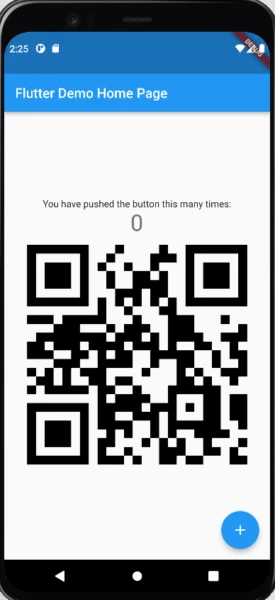
実行結果
簡単ですね。読みだしたらこのブログのトップページに飛ぶことができます。
QRコード読み取り機能
続いて、生成したQRコードを読み取る機能を実装していきます。
準備
qr_code_scanner QRコード読み取りにおいて一番有名所を試しています。 AndroidとiOS向けみたいですが、一旦はこれで良いかと思います。
flutter pub add qr_code_scanner
コード実装
SampleにあるFloatingActionButtonを押したら、QRコードスキャナー画面に遷移するようにします。
floatingActionButton: FloatingActionButton(
  onPressed: () {
    Navigator.of(context).push(MaterialPageRoute(
      builder: (context) => const QRViewExample(),
    ));
  },
  tooltip: 'Increment',
  child: const Icon(Icons.search),
), // Th
遷移先のQRViewExampleは、実行例にあるようなSampleを流用して機能を削っています。
class QRViewExample extends StatefulWidget {
  const QRViewExample({Key? key}) : super(key: key);

  @override
  State<StatefulWidget> createState() => _QRViewExampleState();
}

class _QRViewExampleState extends State<QRViewExample> {
  Barcode? result;
  QRViewController? controller;
  final GlobalKey qrKey = GlobalKey(debugLabel: 'QR');

  // In order to get hot reload to work we need to pause the camera if the platform
  // is android, or resume the camera if the platform is iOS.
  @override
  void reassemble() {
    super.reassemble();
    if (Platform.isAndroid) {
      controller!.pauseCamera();
    }
    controller!.resumeCamera();
  }

  @override
  Widget build(BuildContext context) {
    return Scaffold(
      body: Column(
        children: <Widget>[
          Expanded(flex: 4, child: _buildQrView(context)),
          Expanded(
            flex: 1,
            child: FittedBox(
              fit: BoxFit.contain,
              child: Column(
                mainAxisAlignment: MainAxisAlignment.spaceEvenly,
                children: <Widget>[
                  if (result != null)
                    Text(
                        'Barcode Type: ${describeEnum(result!.format)}   Data: ${result!.code}')
                  else
                    const Text('Not Yet Scanning'),
                ],
              ),
            ),
          )
        ],
      ),
    );
  }

  Widget _buildQrView(BuildContext context) {
    // For this example we check how width or tall the device is and change the scanArea and overlay accordingly.
    var scanArea = (MediaQuery.of(context).size.width < 400 ||
            MediaQuery.of(context).size.height < 400)
        ? 150.0
        : 300.0;
    // To ensure the Scanner view is properly sizes after rotation
    // we need to listen for Flutter SizeChanged notification and update controller
    var qrdata = QRView(
      key: qrKey,
      onQRViewCreated: _onQRViewCreated,
      overlay: QrScannerOverlayShape(
          borderColor: Colors.red,
          borderRadius: 10,
          borderLength: 30,
          borderWidth: 10,
          cutOutSize: scanArea),
      onPermissionSet: (ctrl, p) => _onPermissionSet(context, ctrl, p),
    );

    return qrdata;
  }

  void _onQRViewCreated(QRViewController controller) {
    setState(() {
      this.controller = controller;
    });
    controller.scannedDataStream.listen((scanData) {
      setState(() {
        result = scanData;
      });
    });
  }

  void _onPermissionSet(BuildContext context, QRViewController ctrl, bool p) {
    log('${DateTime.now().toIso8601String()}_onPermissionSet $p');
    if (!p) {
      ScaffoldMessenger.of(context).showSnackBar(
        const SnackBar(content: Text('no Permission')),
      );
    }
  }

  @override
  void dispose() {
    controller?.dispose();
    super.dispose();
  }
}
実行結果
QRコードを適当にスマホで表示して読み込ませてみました。 textとだけ埋め込んだQRコードを読み出したところこのような形になっています。
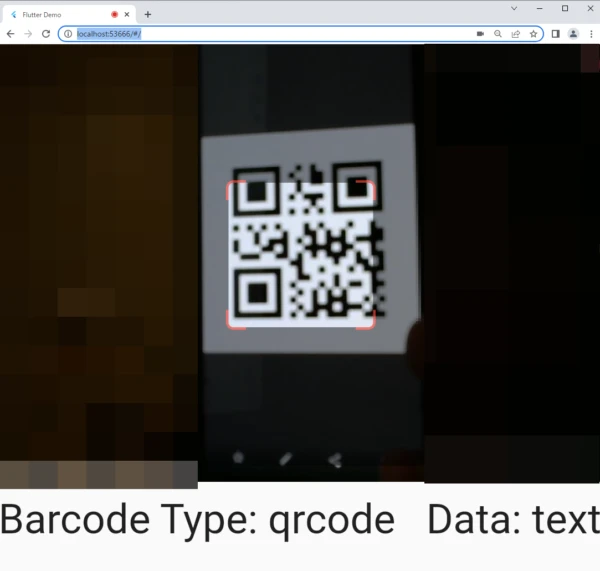
画面の下にあるテキストに読み取った結果を表示しています。
まずは読み取るところまでできました。
Windowsネイティブアプリとして実行した場合
ちなみにWindows Appで実行するとqrviewが表示できない旨のエラーがでます。 もともとQRScannerがAndroidもしくはiOS向けのためこのような結果になるようです。
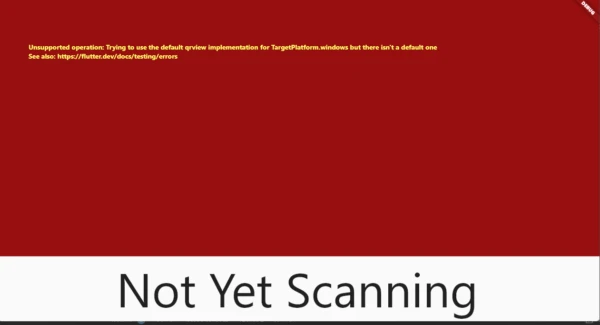
Chromeなどで動かす際には問題ないのですが、Windwos Appとして動かす場合には問題となります。
WindowsやMacOSではWebViewが対応していないことが要因のようですので、まずは一旦切る側で検討します。
全コード
lib/main.dartのコード全文は最終的にこうなりました。
import 'dart:developer';
import 'dart:io';

import 'package:flutter/foundation.dart';
import 'package:flutter/material.dart';
import 'package:qr_code_scanner/qr_code_scanner.dart';
import 'package:qr_flutter/qr_flutter.dart';

void main() {
  runApp(const MyApp());
}

class MyApp extends StatelessWidget {
  const MyApp({super.key});

  // This widget is the root of your application.
  @override
  Widget build(BuildContext context) {
    return MaterialApp(
      title: 'Flutter Demo',
      theme: ThemeData(
        // This is the theme of your application.
        //
        // Try running your application with "flutter run". You'll see the
        // application has a blue toolbar. Then, without quitting the app, try
        // changing the primarySwatch below to Colors.green and then invoke
        // "hot reload" (press "r" in the console where you ran "flutter run",
        // or simply save your changes to "hot reload" in a Flutter IDE).
        // Notice that the counter didn't reset back to zero; the application
        // is not restarted.
        primarySwatch: Colors.blue,
      ),
      home: const MyHomePage(title: 'Flutter Demo Home Page'),
    );
  }
}

class MyHomePage extends StatefulWidget {
  const MyHomePage({super.key, required this.title});

  // This widget is the home page of your application. It is stateful, meaning
  // that it has a State object (defined below) that contains fields that affect
  // how it looks.

  // This class is the configuration for the state. It holds the values (in this
  // case the title) provided by the parent (in this case the App widget) and
  // used by the build method of the State. Fields in a Widget subclass are
  // always marked "final".

  final String title;

  @override
  State<MyHomePage> createState() => _MyHomePageState();
}

class _MyHomePageState extends State<MyHomePage> {
  int _counter = 0;

  void _incrementCounter() {
    setState(() {
      // This call to setState tells the Flutter framework that something has
      // changed in this State, which causes it to rerun the build method below
      // so that the display can reflect the updated values. If we changed
      // _counter without calling setState(), then the build method would not be
      // called again, and so nothing would appear to happen.
      _counter++;
    });
  }

  @override
  Widget build(BuildContext context) {
    // This method is rerun every time setState is called, for instance as done
    // by the _incrementCounter method above.
    //
    // The Flutter framework has been optimized to make rerunning build methods
    // fast, so that you can just rebuild anything that needs updating rather
    // than having to individually change instances of widgets.
    return Scaffold(
      appBar: AppBar(
        // Here we take the value from the MyHomePage object that was created by
        // the App.build method, and use it to set our appbar title.
        title: Text(widget.title),
      ),
      body: Center(
        // Center is a layout widget. It takes a single child and positions it
        // in the middle of the parent.
        child: Column(
          // Column is also a layout widget. It takes a list of children and
          // arranges them vertically. By default, it sizes itself to fit its
          // children horizontally, and tries to be as tall as its parent.
          //
          // Invoke "debug painting" (press "p" in the console, choose the
          // "Toggle Debug Paint" action from the Flutter Inspector in Android
          // Studio, or the "Toggle Debug Paint" command in Visual Studio Code)
          // to see the wireframe for each widget.
          //
          // Column has various properties to control how it sizes itself and
          // how it positions its children. Here we use mainAxisAlignment to
          // center the children vertically; the main axis here is the vertical
          // axis because Columns are vertical (the cross axis would be
          // horizontal).
          mainAxisAlignment: MainAxisAlignment.center,
          children: <Widget>[
            const Text(
              'You have pushed the button this many times:',
            ),
            Text(
              '$_counter',
              style: Theme.of(context).textTheme.headline4,
            ),
            QrImage(
              data: 'https://kenpos.dev',
              version: QrVersions.auto,
              size: 350.0,
            ),
          ],
        ),
      ),
      floatingActionButton: FloatingActionButton(
        onPressed: () {
          Navigator.of(context).push(MaterialPageRoute(
            builder: (context) => const QRViewExample(),
          ));
        },
        tooltip: 'Increment',
        child: const Icon(Icons.search),
      ), // This trailing comma makes auto-formatting nicer for build methods.
    );
  }
}

class QRViewExample extends StatefulWidget {
  const QRViewExample({Key? key}) : super(key: key);

  @override
  State<StatefulWidget> createState() => _QRViewExampleState();
}

class _QRViewExampleState extends State<QRViewExample> {
  Barcode? result;
  QRViewController? controller;
  final GlobalKey qrKey = GlobalKey(debugLabel: 'QR');

  // In order to get hot reload to work we need to pause the camera if the platform
  // is android, or resume the camera if the platform is iOS.
  @override
  void reassemble() {
    super.reassemble();
    if (Platform.isAndroid) {
      controller!.pauseCamera();
    }
    controller!.resumeCamera();
  }

  @override
  Widget build(BuildContext context) {
    return Scaffold(
      body: Column(
        children: <Widget>[
          Expanded(flex: 4, child: _buildQrView(context)),
          Expanded(
            flex: 1,
            child: FittedBox(
              fit: BoxFit.contain,
              child: Column(
                mainAxisAlignment: MainAxisAlignment.spaceEvenly,
                children: <Widget>[
                  if (result != null)
                    Text(
                        'Barcode Type: ${describeEnum(result!.format)}   Data: ${result!.code}')
                  else
                    const Text('Not Yet Scanning'),
                ],
              ),
            ),
          )
        ],
      ),
    );
  }

  Widget _buildQrView(BuildContext context) {
    // For this example we check how width or tall the device is and change the scanArea and overlay accordingly.
    var scanArea = (MediaQuery.of(context).size.width < 400 ||
            MediaQuery.of(context).size.height < 400)
        ? 150.0
        : 300.0;
    // To ensure the Scanner view is properly sizes after rotation
    // we need to listen for Flutter SizeChanged notification and update controller
    var qrdata = QRView(
      key: qrKey,
      onQRViewCreated: _onQRViewCreated,
      overlay: QrScannerOverlayShape(
          borderColor: Colors.red,
          borderRadius: 10,
          borderLength: 30,
          borderWidth: 10,
          cutOutSize: scanArea),
      onPermissionSet: (ctrl, p) => _onPermissionSet(context, ctrl, p),
    );

    return qrdata;
  }

  void _onQRViewCreated(QRViewController controller) {
    setState(() {
      this.controller = controller;
    });
    controller.scannedDataStream.listen((scanData) {
      setState(() {
        result = scanData;
      });
    });
  }

  void _onPermissionSet(BuildContext context, QRViewController ctrl, bool p) {
    log('${DateTime.now().toIso8601String()}_onPermissionSet $p');
    if (!p) {
      ScaffoldMessenger.of(context).showSnackBar(
        const SnackBar(content: Text('no Permission')),
      );
    }
  }

  @override
  void dispose() {
    controller?.dispose();
    super.dispose();
  }
}
まとめ
Flutterにて、QRコードの作成と読み取りが実装できました。 パッケージを使うことでかなり簡単に作成出来るのが良いですね。
今回は殆どパッケージ紹介ですが良いでしょう、