ブログ作りを進める - パンくずリストの実装方法
はじめに
ブログ作りを少しずつではありますが進めています。 今回はパンくずリストと呼ばれる、サイト上の今どこにいるのかを示すやつを作っていきます。
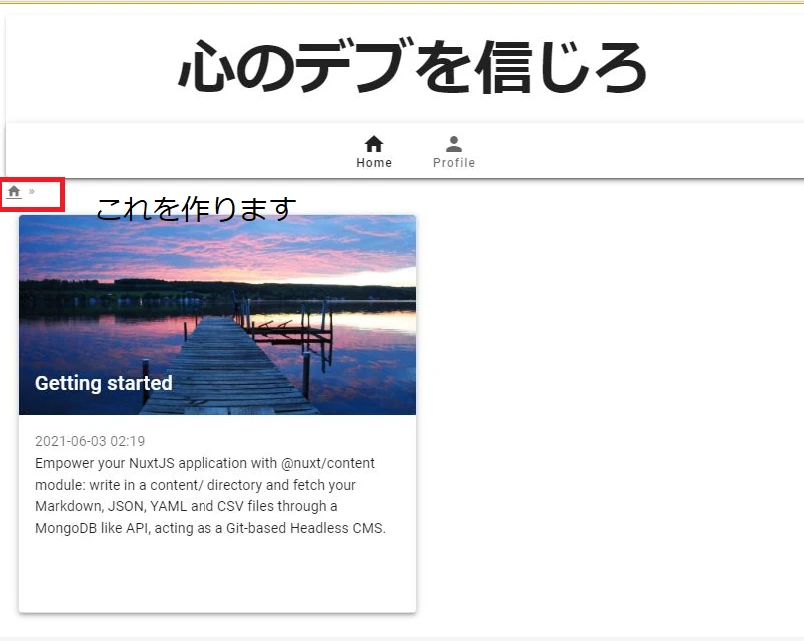
イメージはこちらです。このバーを作っていきましょう。

今回参考にしたのはこのブログ記事です。 参考元:The Perfect Breadcrumbs (in Nuxt)
Nuxt.js+Vuetify.jsを使ってブログを作っていこう この記事を基に進めていきます。
作り方
いろんな作り方があるようですが、Contentのフォルダ階層に伴って作られるURLを取得して、 取得したURLをnuxt-linkで並べるような作りで行きます。
componentsにBreadcrumbs.vueというファイルを作成します。
scriptタグ
先ずはScriptタグから作っていきます。
<script>
export default {
  props: {
    breadcrumb: {
      type: String,
      default: null,
    },
  },
  computed: {
    crumbs() {
      const fullPath = this.$route.fullPath
      const params = fullPath.startsWith('/')
        ? fullPath.substring(1).split('/')
        : fullPath.split('/')
      const crumbs = []
      let path = ''

      params.forEach((param, index) => {
        path = `${path}/${param}`
        const match = this.$router.match(path)
        if (match.name !== null) {
          crumbs.push({
            breadcrumb: param.replace('/-/g', ' '),
            ...match,
          })
        }
      })
      return crumbs
    },
  },
}
</script>
URLのパスを取得するのがここです。
const fullPath = this.$route.fullPath
取得できるパスはこのような形式です。 localhost:3000/profile → /profile
paramsの中身にはURLパスが入っているため、表示しやすいようにcrumbs配列に追加していきます。
params.forEach((param, index) => {
  path = `${path}/${param}`
  const match = this.$router.match(path)
  if (match.name !== null) {
    crumbs.push({
      breadcrumb: param.replace('/-/g', ' '),
      ...match,
    })
  }
templateタグ
templateタグ内はこのように記載します。
<template>
    <div>
    <li property="itemListElement" typeof="ListItem">
      <nuxt-link property="item" typeof="WebPage" to="/">
          <v-icon to="/" small>mdi-home</v-icon>
        </v-btn>
      </nuxt-link>
      <meta property="position" content="1" />
    </li>
    <li
      v-for="(crumb, index) in crumbs"
      :key="index"
      property="itemListElement"
      typeof="ListItem"
    >
      <nuxt-link property="item" typeof="WebPage" :to="crumb.path">
        <span property="name">{{
          $route.fullPath === crumb.path && title !== null ? title : crumb.title
        }}</span>
      </nuxt-link>
      <meta property="position" :content="index + 2" />
    </li>
    </div>
</template>
Homeはi-conで表示したいのでここに書きましょう。
<li property="itemListElement" typeof="ListItem">
  <nuxt-link property="item" typeof="WebPage" to="/">
      <v-icon to="/" small>mdi-home</v-icon>
  </nuxt-link>
  <meta property="position" content="1" />
</li>
後続のパスを表示するのに、v-forを使って書き出していきます。
<li
  v-for="(crumb, index) in crumbs"
  :key="index"
  property="itemListElement"
  typeof="ListItem"
>
  <nuxt-link property="item" typeof="WebPage" :to="crumb.path">
    <span property="name">{{
      $route.fullPath === crumb.path && breadcrumb !== null ? breadcrumb : crumb.breadcrumb
    }}</span>
  </nuxt-link>
  <meta property="position" :content="index + 2" />
</li>
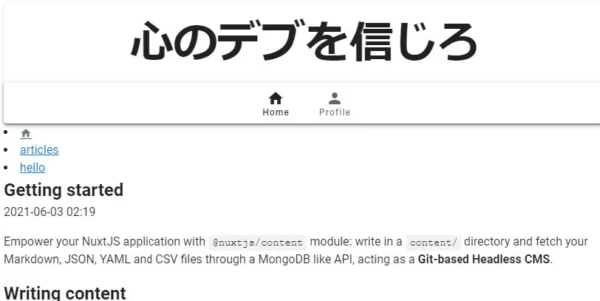
実行結果
この状態ではこのような表示となります。
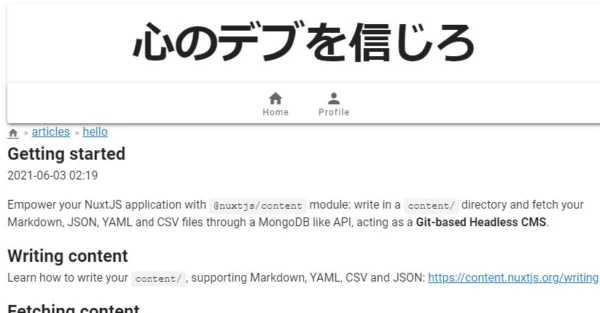
style追加
一列で表示したいのでこんな風にします。
<style scoped>
li {
  display: inline;
}
li:after {
  content: ' » ';
  display: inline;
  font-size: 0.9em;
  color: #aaa;
  padding: 0 0.0725em 0 0.15em;
}
li:last-child:after {
  content: '';
}
</style>
全ページに表示されるようにする
layout/default.vueに追加しましょう。 作ったBreadcrumbs.vueの中身を追加します。
<template>
  <v-app dark>
    <v-main>
      <v-container>
        <Header />
        <Breadcrumbs />
        <Nuxt />
      </v-container>
     </v-main>

    <v-footer
      :absolute="!fixed"
      app
    >
      <span>© {{ new Date().getFullYear() }}</span>
    </v-footer>
  </v-app>
</template>
こんな感じで書いていきます。
まとめ
パンクズリストを作る方法を記載しました。 調べてみるとみんな三者三様の作り方をしていて何が良いのか迷いますね。 vuetifyに用意されているパンくずリストもあるのですが…今回はこの実装です。
カテゴリとタグ検索を実装したタイミングで実装方法は見直そうと思います。